Call REST API in Service Bus 12.2.1.2 (JSON Request/Response)
In this example, we will create a similar integration as to this previous post; the only difference will be that both Request and Response will be in JSON format. So let’s call it a typed REST service.
We will call a REST API with JSON data format (parameters as input), and as a Response, we will get JSON also. So, if you have a requirement to work with some RESTful API that works only with JSON data format, you can do it easily in the Service Bus 12.2.1.2 version without converting to XSD. All data mapping can be done in JavaScript activity. JavaScript is not limited to REST services. We can use JavaScript in any service. Here, we will call this Weather data Rest API and retrieve some JSON information.
For more information on this API and how to use it, you can visit the Open Wheater site
Demo
We will create:
- REST Proxy Service – where we will provide the parameter for the API call
- Pipeline
- REST Business service – actual call to the REST API.
This is how end result should look like and what folder structure is proposed.
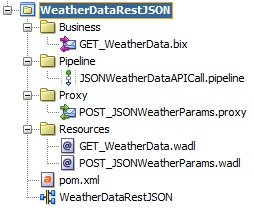
As a first step after creating the project, start by creating the necessary folders: Business, Proxy, Pipeline, and Resources.
REST Proxy Service
Right-click in the Proxy Service lane and choose REST, or another option is to drag and drop the REST activity from the Service Bus Components from the right side of the jDeveloper.

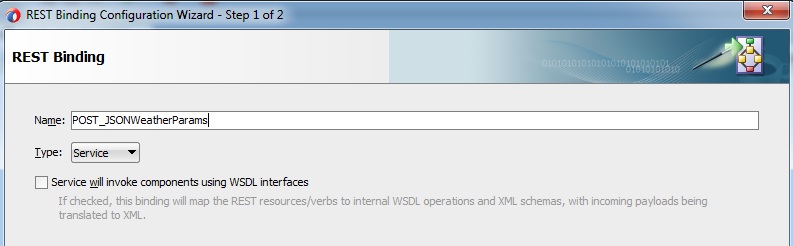
Now name your Proxy service which will be used for posting the JSON parameters as a request.
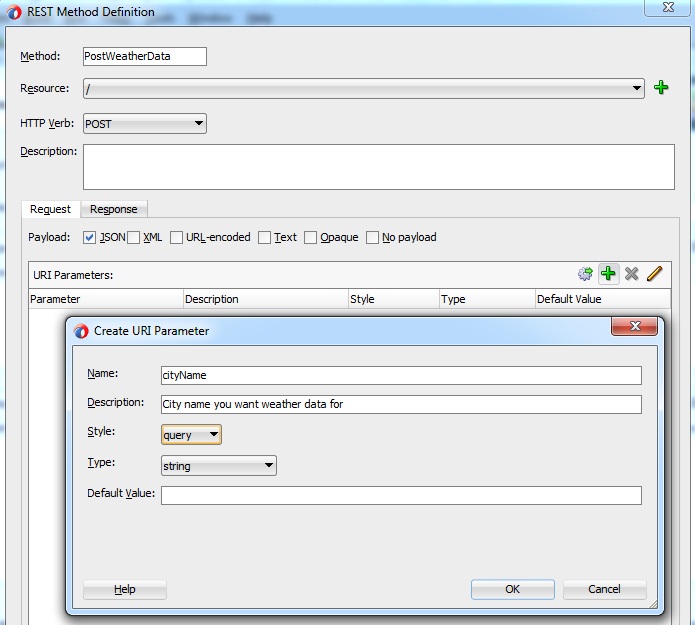
In the next step in the Methods section, click on the plus icon, which represents “Add a new REST method”.

A new window will show up for Request and Response methods. First, we will create a Request method by adding the parameters. In the section URI Parameters, click on the green plus sign to add a new parameter and fill out the info as in the picture. You don’t need to fill in the Description field, that was just a short explanation.
Now do the same for the second parameter:

The request tab should look like the next picture:

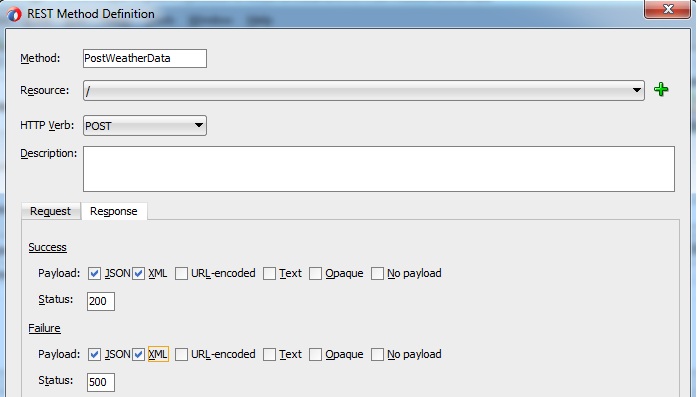
For the Response tab, we can choose both JSON and XML as a payload option:
Click Finish, and your Proxy service will be created, and one important thing will be created also, and that is WADL. If you create a folder named Resources generated, WADL will be stored in that folder automatically.
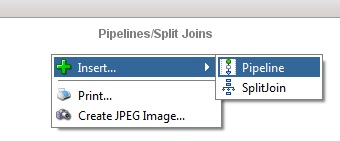
Pipeline creation
Next, we will create a pipeline by right-clicking in the Pipeline/Split Joins lane.
Now name your pipeline and choose the folder where you want it to be created.

In the next wizard’s window, we will do 3 steps:
- Uncheck the “Expose as a Proxy Service” – we already have a proxy service, so we will not use this feature.
- Select REST as a Service Type and
- Click on the “Browse WADLs” icon to select a WADL.
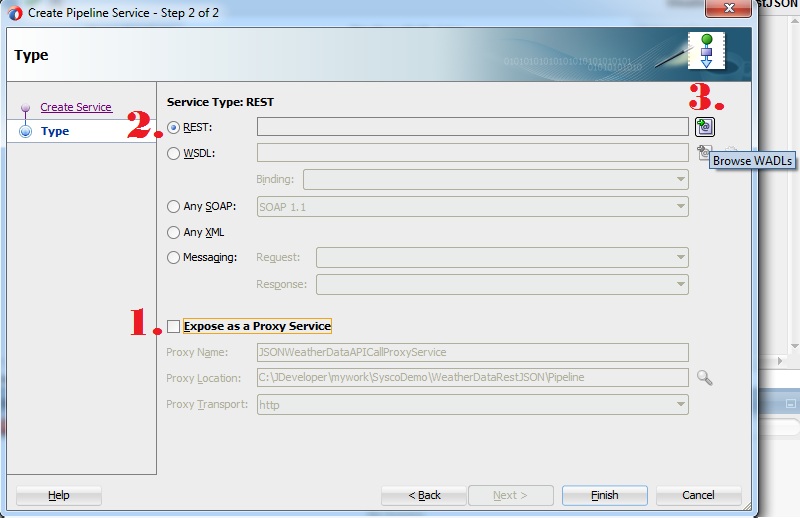
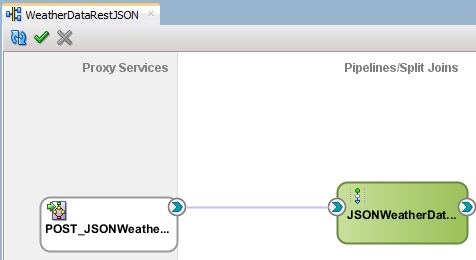
Here, you will select the WADL created from our Proxy service. And as a last step, click finish, and your Pipeline will be created. Now just what is left is to connect the Proxy Service with the Pipeline.

REST Business Service
Next is to set up the REST Business Service, which will do the call to the Weather REST API. Right-click in the External Services lane and choose REST again. Name your Business Service and click Next.

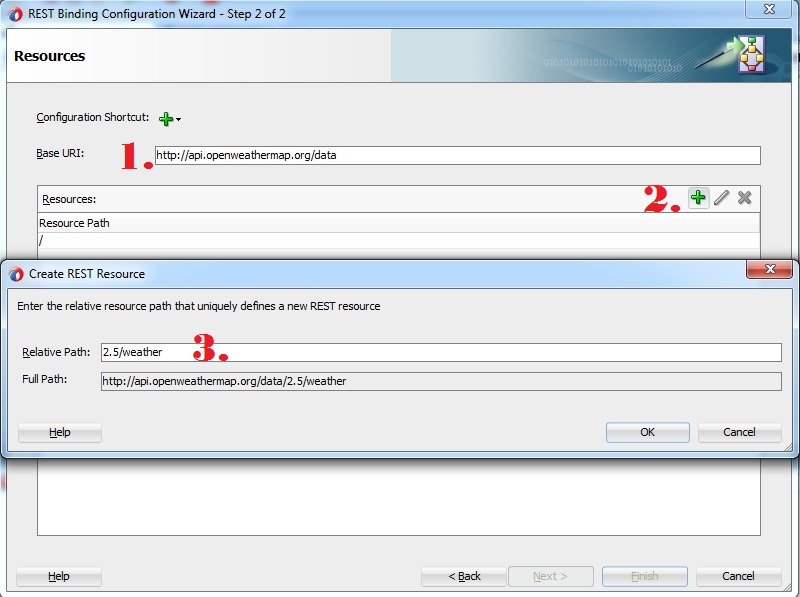
In the next window, we have 3 steps to do:
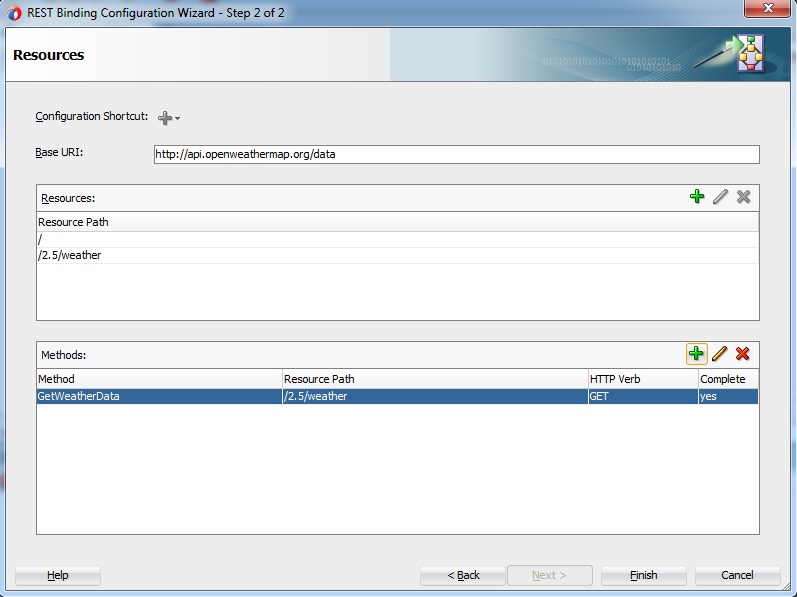
- Add Base URI from the Weather API we will use: http://api.openweathermap.org/data
- Then, you must add and create a REST resource by clicking the green plus icon in the Resources section.
- In Relative path, add: 2.5/weather – and you can see the full path and double check that it’s ok.
The next step is to add a REST method by clicking the green plus icon in the Methods section.

Next, for Request do:
- Name your method.
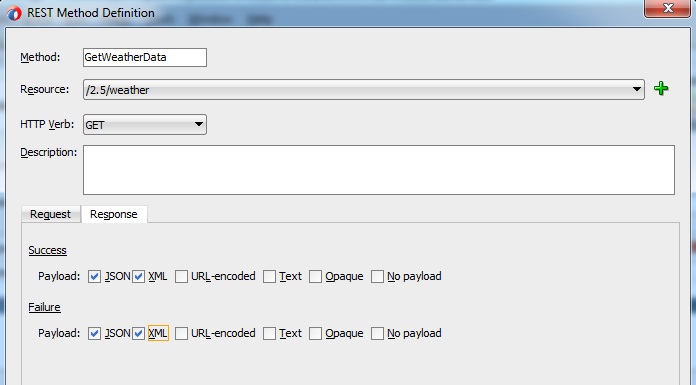
- Select the HTTP verb as GET.
- Repeat the steps for parameters as in the creation of a Proxy Service.

The response tab can look like this using both JSON and XML. Click Finish.
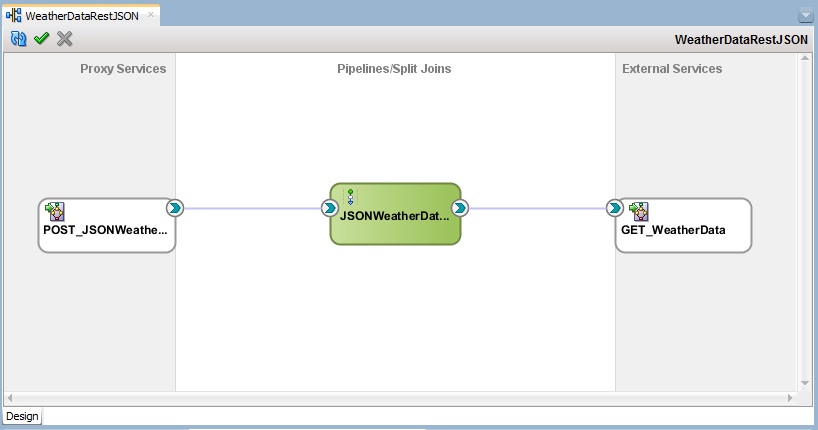
The final version of the REST Business service and how it should look like. Also, Design view where you connect Business service with Pipeline.
Pipeline implementation of the REST call
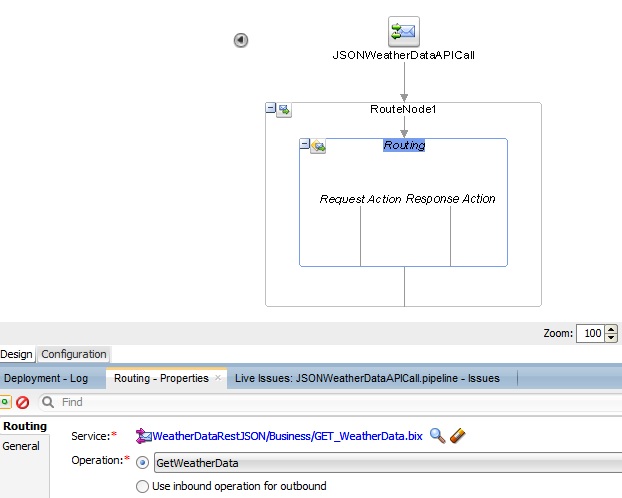
Now, we will implement the logic behind the REST API call in the pipeline. So, do a double-click to open the pipeline. This is the image you should have once inside the pipeline. The first thing to do is to click on the Routing and at the bottom in Routing Properties, change the Operation to “GetWeatherData” in our case, which we created in Business service.
To call a REST service with parameters, we have to use Query parameters inside the transport request element of the call towards our Weather Data API. So, we need to add them to the $outbound variable. This is the same way we received the query parameters from the $inbound variable in the request. We will do that by dragging/dropping the Insert activity from the Components section on the right side into the Request Action lane.
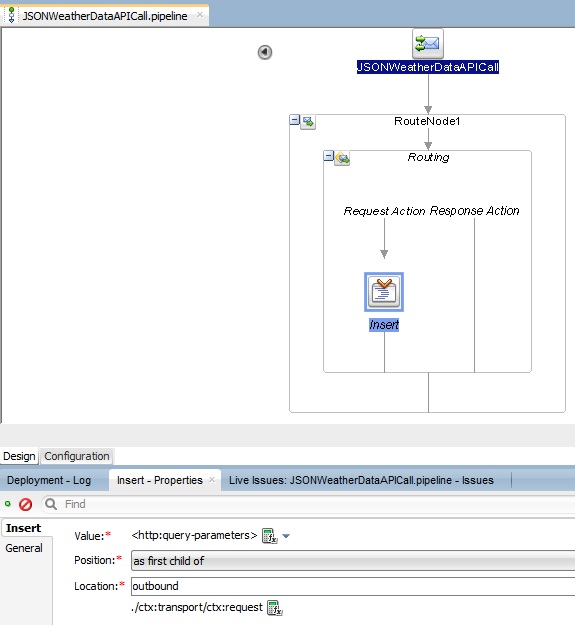
Set the Insert Properties like this: Value:
Position: as the first child of Location: select the outbound variable from the drop-down and add an expression for the specific element. In this case we need:
This is all we need to call and get the Weather data and get a JSON Response back from the API. Now we can deploy and test the integration.
Testing
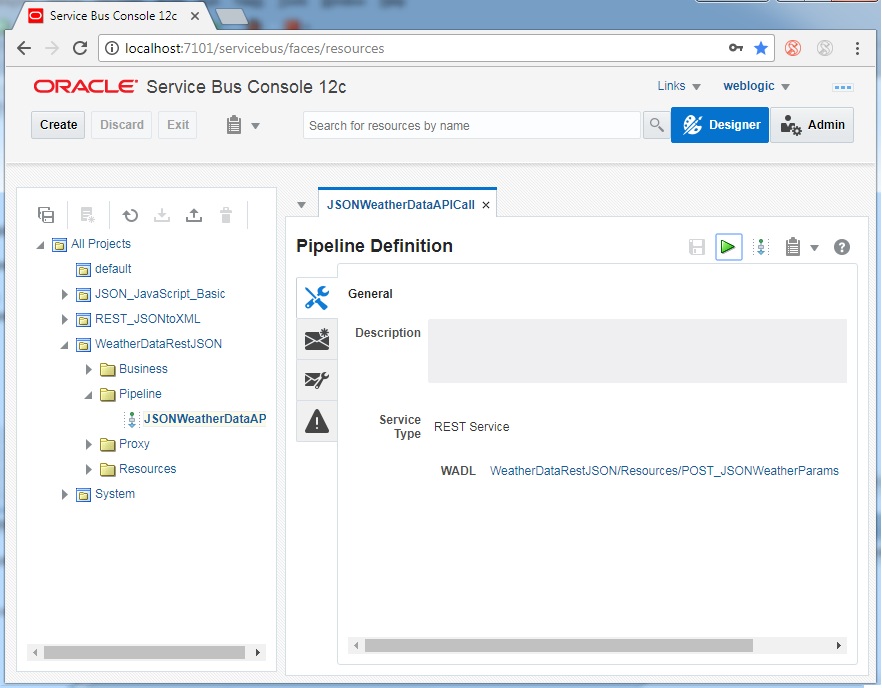
Log to your service bus console and find the deployed project. We can test this in two ways using a “Test Console”. We can do it from the Proxy service directly, but for Debugging and a detailed view of the execution flow, we will use Pipeline.
So, expand your Pipeline folder and click on the pipeline name to open it. When it’s opened click on the green play button on the right side of the screen inside the pipeline window.
In the Test Console, fill the necessary fields for testing and just click Execute.

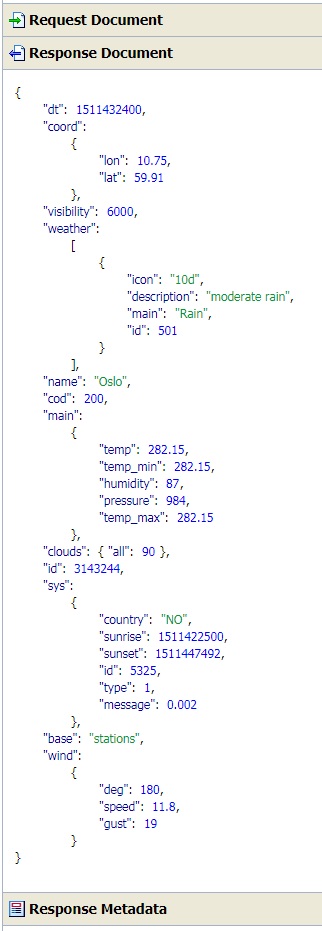
Now you should get the results:
Next, what we can try and test is to extract some of the data from this JSON response and create a small XML, for example. This will be done by adding the JavaScript activity in the Response Activity line inside the Pipeline.
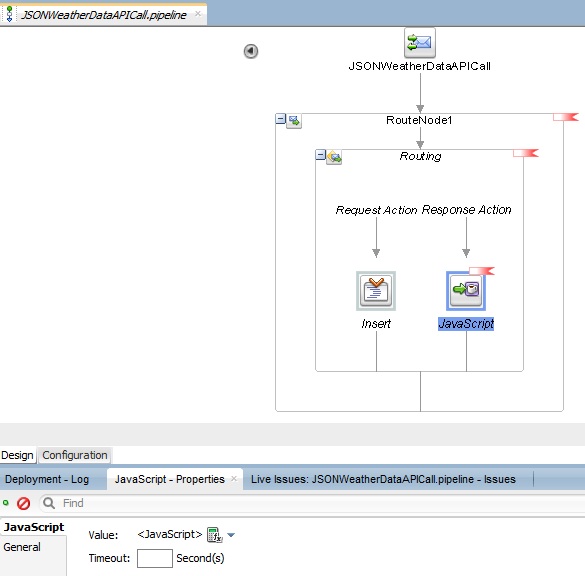
Now, we need to populate the JavaScript Value.
And you can use this code for creating new variables in JavaScript activity.

Click ok, save your work in the pipeline, and redeploy the integration so we can test it again.
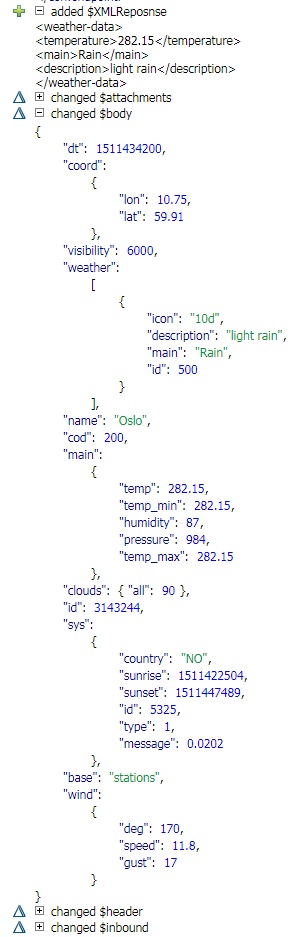
Just repeat the same steps from the first test, go to the Invocation trace section, and expand the $outbound and our $XMLResponse variable.

In the $outbound variable, we can see the <query-parameters> element with our parameter values towards the Weather API.
The $body variable is clean JSON data without any conversions.
Hope this was helpful! 💚